UCSD CSE131 Syllabus and Logistics
- Joe Gibbs Politz (Instructor)
- OH: Tuesday 3pm and Wednesday 1pm, CSE 3206 (Joe's office)
- Shaurya Raswan (TA)
- OH: Mondays at 12PM, B275 CSE Basement or Zoom
Basics - Schedule - Staff & Resources - Grading - Policies
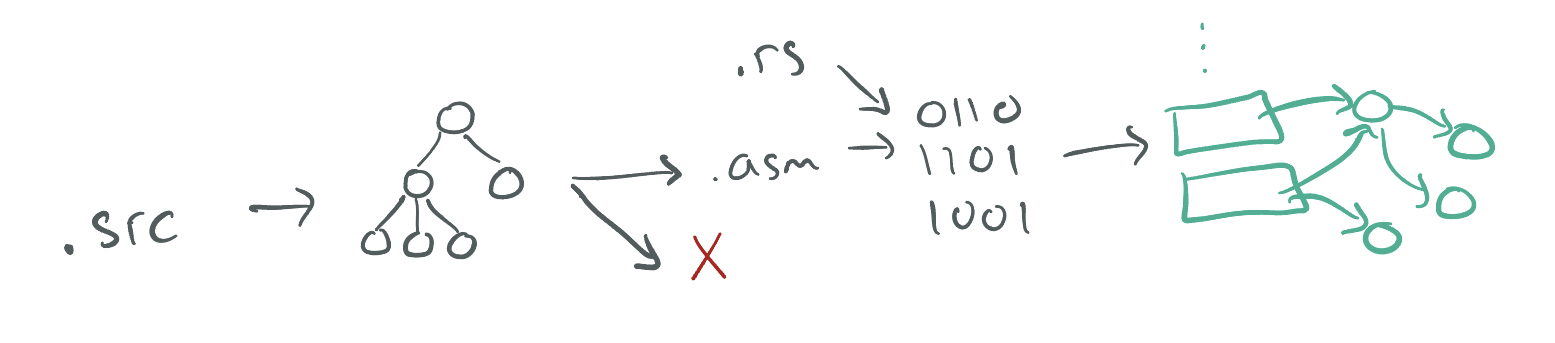
In this course, we'll explore the implementation of compilers: programs that transform source programs into other useful, executable forms. This will include understanding syntax and its structure, checking for and representing errors in programs, writing programs that generate code, and the interaction of generated code with a runtime system.
We will explore these topics interactively in lecure, you will implement an increasingly sophisticated series of compilers throughout the course to learn how different language features are compiled, and you will think through design challenges based on what you learn from implementation.
This web page serves as the main source of announcements and resources for the course, as well as the syllabus.
Basics
- Office Hours:
- Joe: Tuesday 3pm and Wednesday 1pm, CSE 3206 (Joe's office)
- Shaurya: Monday 12pm, also discussion Wednesday 12pm (CSE B275)
- Q&A Forum: Piazza
- Textbook/readings: There's no official textbook, but we will link to different online resources for you to read to supplement lecture. Versions of this course have been taught at several universities, so sometimes I'll link to those instructors' materials as well. Some useful resources are:
Schedule
The schedule below outlines topics, due dates, and links to assignments. The schedule of lecture topics might change slightly, but I post a general plan so you can know roughly where we are headed.
Week 7 –Optimizations and Types
- Wednesday Lecture Chalkboard
- Readings
Week 6 - Types, Towards Optimization
Week 5 - Code Reviews (no lecture)
Week 4 -Functions and Calling Conventions
- Wednesday Handout - Wednesday implemented; scroll to BOTTOM to see full copilot chat log
- Reading and Resources:
Week 3 –Binary Operators, Types, and the JIT
- Friday Handout Filled
- Wednesday Handout Filled
- Monday Handout Filled
- Max New on Conditionals
- Max New on Tagging
- Wikipedia on the AMD64 Calling Convention
Week 2 –Binary Operators, Types, and the JIT
- Friday Handout
- Wednesday Code
- Monday Code
- Max New on
let - Memory Representation of Values in Ocaml More discussion of a language with tagged value representations (and Ocaml is type-checked!).
- V8 Blog Post Including Number Representations This goes a little further than we are right now, but focus on the fact that V8, one of the widely deployed JS engines, uses tag bits for its numbers.
Week 1 - Rust and Source to Assembly Conversion
- Assignment 1
- Repository (includes PDF of handout)
- Friday Handout [Filled]
- Wednesday Handout [Filled]
- Monday Handout
- Reading and resources:
- Rust Book Chapters 1-6
- x86-64 quick reference (Stanford)
- x86-64 quick reference (Brown)
- Max New on Adder Max New and Ben Lerner have done a nice job writing up notes on some of my original scrawlings around this material. They don't use exactly the same style or make the same decisions I do in this class, so make sure you implement what's in our assignments, not what they wrote, but things are close enough to be useful.
Week 0 – Welcome
- Friday In-class Notes
- Friday repository
- Friday Handout
- Reading and resources:
Course Components and Grading
Your grade will be calculated from engagement, assignments, and code demos.
-
Assignments are given periodically, typically at one or two week intervals. On each you'll get a score from 0-4.
Assignments will have a mix of written work and programming work. The written work will include things like:
- describing and justifying design decisions you made in your compiler
- giving a description of implementation or tradeoffs in a potential design decision one could make
- doing code review of other students' compilers
We plan for 6 total assignments – this ended up being 7! There will be opportunities for later assignments to count towards credit for earlier assignments:
- The grade for Boa will be the max of HydraBoa's grade and Boa's grade
- The grade for Diamondback will be the max of Eastern Diamondback's grade and Diamondback's grade
- We managed to reach 7 assignments, but did not change the cutoffs, giving more ways to reach the grade thresholds for assignments
-
Code Demos are the exams for the course. Twice during the quarter you will meet in-person with the instructor and/or a TA for a code review of a recent assignment. You will demonstrate your code running on examples we provide in the code review and walk us through how your code works on those examples. We will assign a 0-4 score and will also give feedback on what you'd need to fix to raise your score. More details about the promps and scheduling will be shared in advance of the reviews.
In finals week, you will have a chance for a second round code review for one of your in-quarter code reviews, which can raise your score by up to 3 points (e.g. 0 to 3, 1 to 4, 2 to 4) on that review. In the second round review you will present your response to our feedback from the first review.
This is also the only policy for make-ups for a missed code review during the quarter: scheduling a second round review in finals week. A missed review has a maxiumum score of 3 for the rescheduled review. Missing both in-quarter reviews puts a C ceiling on your grade (if you miss one you can still earn an A).
The standards for grade levels are below. You must achieve the thresholds for all course elements to earn that letter grade.
- A:
- Code review point total 7 or 8 (including second round reviews)
- Assignment point total 20 or higher (update: out of 28)
- B:
- Exam point total 5 or 6 (including second round reviews)
- Assignment point total 16 or higher (update: out of 28)
- C
- Exam point total 3 or 4
- Assignment point total 12 or higher (update: out of 28)
+/- modifiers will be assigned around the boundaries of these categories consistently across students, and will also take into consideration participation in class and Piazza, as well as exceptional assignment or code review performance.
Policies
Programming, AI, and Collaboration
We encourage you to attempt all programming projects yourself first. They are meant to provide productive learning and to prepare you to present your understanding in code reviews.
Of course, there is lots of valuable learning you can get from discussing the assignments with us and with your peers, and we encourage it after you've made attempts yourself. When you work together with anyone (including course staff!), you should properly credit them. See the guidelines below for crediting other students you work with.
Though we discourage you using it as a way to get started, write entire functions, or set up your project, you're welcome to use AI tools to aid your programming. In particular, it may be useful for learning new Rust idioms or autocompleting “routine” parts of functions to save time. However, we both (a) from experience don't think that AI agents are very good at writing the core logic of the compilers in this class and (b) will be checking your understanding of the code you wrote in code reviews. So you should be able to understand, trace, debug, and update any code that you generate from an AI tool.
In each assignment:
- Any code that you didn't write must be cited in the CREDITS.txt file that
goes along with your submission, or in an inline comment next to the code you
didn't write.
- Example: On an open collaboration assignment, you and another student chat online about the solution, you figure out a particular helper method together. Put an inline comment next to the FOO method saying “This FOO method was developed in collaboration with Firstname Lastname”
- Example: On an open collaboration assignment, a student posts the compilation strategy they used to handle a type of expression you were struggling with. Your CREDITS.txt could say “I used the code from the forum post at [link]”
- Example: If a function or a substantial logical chunk of code was generated by ChatGPT, Copilot, or another LLM or AI system you could put an inline comment next to the code describing the prompt you used to get it if you do.
- Anyone you work with in-person must be noted in your CREDITS.txt
- Example: You and another student sit next to each other in the lab, and point out mistakes and errors to one another as you work through the assignment. As a result, your solutions are substantially similar. Your CREDITS.txt should say “I collaborated with Firstname Lastname to develop my solution.”
- Do not share publicly your entire repository of code or paste an entire solution into a message board. Keep snippets to reasonable, descriptive chunks of code; think a dozen lines or so to get the point across.
- You cannot use whole solutions that you find online (though it's OK to copy-paste from Stack Overflow, tutorials etc, if you need help with Rust patterns, etc.) You shouldn't get assistance or code from students outside of this offering of the class. All the code that is handed in should be developed by you or someone in the class.
Late Work
Late work is generally not accepted, because often we'll release partial or full solutions immediately following the deadline for an assignment. Opportunities for making up missed credit are given in other ways, and will be described throughout the quarter.
Regrades
Mistakes occur in grading. Once grades are posted for an assignment, we will allow a short period for you to request a fix (announced along with grade release). If you don't make a request in the given period, the grade you were initially given is final.
Exams
You should not discuss the details of your code reviews with anyone outside the course staff until the whole class has received their grades for it.
Laptop/Device Policy in Lecture
There are lots of great reasons to have a laptop, tablet, or phone open during class. You might be taking notes, getting a photo of an important moment on the board, trying out a program that we're developing together, and so on. The main issue with screens and technology in the classroom isn't your own distraction (which is your responsibility to manage), it's the distraction of other students. Anyone sitting behind you cannot help but have your screen in their field of view. Having distracting content on your screen can really harm their learning experience.
With this in mind, the device policy for the course is that if you have a screen open, you either:
- Have only content onscreen that's directly related to the current lecture.
- Have unrelated content open and sit in one of the back two rows of the room to mitigate the effects on other students. I may remind you of this policy if I notice you not following it in class. Note that I really don't mind if you want to sit in the back and try to multi-task in various ways while participating in lecture (I may not recommend it, but it's your time!)
Professionalism
This is an upper division course, so everyone here has been in college for a little bit. Indeed, you are likely closer to your post-college life than the start of it.
Practicing being a professional should start now for you, if it hasn't already. Some of the people in this course may be your colleagues in the near future! In the context of this course, the goal is learning about (and building!) compilers. So professionalism means making choices that are more likely to increase your learning and the learning of those around you. Keep course discussions on topics around compilers, don't demean or talk down to fellow students, don't do things solely to show off or compare yourself to other students, make space for others in discussions (and take space if you need to), and so on.
UCSD has Principles of Community that apply across campus and in this class; they are a good baseline for principles of professional behavior. Feel free to talk to me about things regarding the class climate that could improve your learning.

Adder
In this assignment you'll implement a compiler for a small language called
Adder, that supports 32-bit integers and three operations – add1, sub1,
and negate. There is no starter code for this assignment; you'll do it from
scratch based on the instructions here.
Setup
A few environments are supported:
-
The necessary tools are installed on
ieng6.ucsd.edu; you should be able to log in there with your ActiveDirectory credentials and run theCSE131_FA25_A00command to get things set up. -
You can copy this
devcontainersetup and use Github Codespaces: https://github.com/ucsd-cse131-fa25/2025-09-26-lecture/tree/main/.devcontainer -
You may also want to work on your own computer. You will need to install
rustandcargo:https://www.rust-lang.org/tools/install
You may also (depending on your system) need to install
nasm. On OSX I usedbrew install nasm; on other systems your package manager of choice likely has a version. On Windows you should use Windows Subsystem for Linux (WSL)The assignments assume that your computer can build and run x86-64-bit binaries. This is true of most (but not all) mass-market Windows and Linux laptops. Newer Macs use a different ARM architecture, but can also run legacy x86-64-bit binaries, so those are fine as well. You should ensure that whatever you do to build your compiler also runs on
ieng6, which is our standard environment for testing these.
The first few sections of the Rust Book walk you through installing Rust, as well. We'll assume you've gone through the “Programming a Guessing Game” chapter of that book before you go on, so writing and running a Rust program isn't too weird to you.
The Adder Language
In each of the next several assignments, we'll introduce a language that we'll implement. We'll start small, and build up features incrementally. We're starting with Adder, which has just a few features –numbers and three operations.
There are a few pieces that go into defining a language for us to compile:
- A description of the concrete syntax – the text the programmer writes.
- A description of the abstract syntax – how to express what the programmer wrote in a data structure our compiler uses.
- A description of the behavior of the abstract syntax, so our compiler knows what the code it generates should do.
Concrete Syntax
The concrete syntax of Adder is:
<expr> :=
  | <number>
  | (add1 <expr>)
  | (sub1 <expr>)
  | (negate <expr>)
Abstract Syntax
The abstract syntax of Adder is a Rust datatype, and corresponds nearly
one-to-one with the concrete syntax. We'll show just the parts for add1 and
sub1 in this tutorial, and leave it up to you to include negate to get
practice.
enum Expr {
    Num(i32),
    Add1(Box<Expr>),
    Sub1(Box<Expr>)
}
The Box type is necessary in Rust to create recursive types like these (see
Enabling Recursive Types with
Boxes).
If you're familiar with C, it serves roughly the same role as introducing a
pointer type in a struct field to allow recursive fields in structs.
The reason this is necessary is that the Rust compiler calculates a size and
tracks the contents of each field in each variant of the enum. Since an
Expr could be an Add1 that contains another Add1 that contains another
Add1... and so on, there's no way to calculate the size of an enum variant like
Add1(Expr)
(What error do you get if you try?)
Values of the Box type always have the size of a single reference (probably
represented as a 64-bit address on the systems we're using). The address will
refer to an Expr that has already been allocated somewhere. Box is one of
several smart pointer types whose memory are carefully, and automatically,
memory-managed by Rust.
Semantics
A ``semantics'' describes the languages' behavior without giving all of the assembly code for each instruction.
An Adder program always evaluates to a single i32.
- Numbers evaluate to
themselves (so a program just consisting of
Num(5)should evaluate to the integer5). add1andsub1expressions perform addition or subtraction by one on their argument.negateproduces the result of the argument multiplied by-1
There are several examples further down to make this concrete.
Here are some examples of Adder programs:
Example 1
Concrete Syntax
(add1 (sub1 5))
Abstract Syntax
Add1(Sub1(Number(5)))
Result
5
Example 2
Concrete Syntax
4
Abstract Syntax
Number(4)
Result
4
Example 3
Concrete Syntax
(negate (add1 3))
Abstract Syntax
Negate(Add1(Number(3)))
Result
-4
Implementing a Compiler for Adder
We're going to start by just compiling numbers, so we can see how all the infrastructure works. We won't give starter code for this so that you see how to build this up from scratch.
By just compiling numbers, we mean that we'll write a compiler for a language where the “program” file just contains a single number, rather than full-fledged programs with function definitions, loops, and so on. (We'll get there!)
Creating a Project
First, make a new project with
$ cargo new adder
This creates a new directory, called adder, set up to be a Rust project.
The main entry point is in src/main.rs, which is where we'll develop the
compiler. There's also a file called Cargo.toml that we'll use in a little
bit, and a few other directories related to building that we won't be too
concerned with in this assignment.
The Runner
We'll start by just focusing on numbers.
It's useful to set up the goal of our compiler, which we'll come back to repeatedly in this course:
“Compiling” an expression means generating assembly instructions that evaluate it and leave the answer in the
raxregister.
Given this, before writing the compiler, it's useful to spend some time thinking about how we'll run these assembly programs we're going to generate. That is, what commands do we run at the command line in order to get from our soon-to-be-generated assembly to a running program?
We're going to use a little Rust program to kick things off. It will look like
this; you can put this into a file called runtime/start.rs:
#[link(name = "our_code")]
extern "C" {
    // The \x01 here is an undocumented feature of LLVM (which Rust uses) that ensures
    // it does not add an underscore in front of the name, which happens on OSX
    // Courtesy of Max New
    // (https://maxsnew.com/teaching/eecs-483-fa22/hw_adder_assignment.html)
    #[link_name = "\x01our_code_starts_here"]
    fn our_code_starts_here() -> i64;
}

fn main() {
  let i : i64 = unsafe {
    our_code_starts_here()
  };
  println!("{i}");
}
This file says:
- We're expecting there to be a precompiled file called
libour_codethat we can load and link against (we'll make it in a few steps) - That file should define a global function called
our_code_starts_here. It takes no arguments and returns a 64-bit integer. - For the
mainof this Rust program, we will call theour_code_starts_herefunction in anunsafeblock. It has to be in anunsafeblock because Rust doesn't and cannot check thatour_code_starts_hereactually takes no arguments and returns an integer; it's trusting us, the programmer, to ensure that, which isunsafefrom its point of view. Theunsafeblock lets us do some kinds of operations that would otherwise by compile errors in Rust. - Then, print the result.
Let's next see how to build a libour_code file out of some x86-64 assembly
that will work with this file. Here's a simple assembly program that has a
global label for our_code_starts_here that has a “function body” that
returns the value 31:
section .text
global our_code_starts_here
our_code_starts_here:
  mov rax, 31
  ret
Put this into a file called test/31.s if you like, to test things out (you
should now have a runtime/ and a test/ directory that you created).
We can create a standalone binary program that combines these with these
commands (substitute macho64 for elf64 on OSX):
$ nasm -f elf64 test/31.s -o runtime/our_code.o
$ ar rcs runtime/libour_code.a runtime/our_code.o
$ ls runtime
libour_code.a          our_code.o             start.rs
$ rustc -L runtime/ runtime/start.rs -o test/31.run
$ ./test/31.run
31
The first command assembles the assembly code to an object file. The basic
work there is generating the machine instructions for each assembly
instruction, and enough information about labels like our_code_starts_here to
do later linking. The ar command takes this object file and puts it in a
standard format for library linking used by #[link in Rust. Then
rustc combines that .a file and start.rs into a single executable binary
that we named 31.run.
We haven't written a compiler yet, but we do know how to go from files
containing assembly code to runnable binaries with the help of nasm and
rustc. Our next task is going to be writing a program that generates assembly
files like these.
Generating Assembly
Let's revisit our definition of compiling:
“Compiling” an expression means generating assembly instructions that evaluate it and leave the answer in the
raxregister.
Since, for now, our programs are going to be single expressions (in fact just
single numbers), this means that for a program like “5”, we want to generate
assembly instructions that put the constant 5 into rax.
Let's write a Rust function that does that, with a simple main function that
shows it working on a single hardcoded input; this goes in src/main.rs and is
the start of our compiler:
/// Compile a source program into a string of x86-64 assembly
fn compile(program: String) -> String {
    let num = program.trim().parse::<i32>().unwrap();
    return format!("mov rax, {}", num);
}

fn main() {
    let program = "37";
    let compiled = compile(String::from(program));
    println!("{}", compiled);
}
You can compile and run this with cargo run:
$ cargo run
   Compiling adder v0.1.0 (/Users/joe/src/adder)
mov rax, 37
Really all I did here was look up the documentation in Rust about converting a
string to an integer and template the number into a mov command. The input
37 is hardcoded, and to use the output like we did above, we'd need to
copy-paste the mov command into a larger assembly file with
our_code_starts_here, and so on.
Here's a more sophisticated main that takes two command-line arguments: a
source file to read and a target file to write the resulting assembly to. It
also puts the generated command into the template we designed for our generated
assembly:
use std::env;
use std::fs::File;
use std::io::prelude::*;

fn main() -> std::io::Result<()> {
    let args: Vec<String> = env::args().collect();

    let in_name = &args[1];
    let out_name = &args[2];

    let mut in_file = File::open(in_name)?;
    let mut in_contents = String::new();
    in_file.read_to_string(&mut in_contents)?;

    let result = compile(in_contents);

    let asm_program = format!("
section .text
global our_code_starts_here
our_code_starts_here:
  {}
  ret
", result);

    let mut out_file = File::create(out_name)?;
    out_file.write_all(asm_program.as_bytes())?;

    Ok(())
}
Since this now expects files rather than hardcoded input, let's make a test
file in test/37.snek that just contains 37 as contents. Then we'll read the
“program” (still just a number) from 37.snek and store the resulting
assembly in 37.s. (snek is a meme-y spelling of snake, which is a theme of
the languages in this course.)
Then we can run our compiler with these command line arguments:
$ cat test/37.snek
37
$ cargo run -- test/37.snek test/37.s
$ cat test/37.s

section .text
global our_code_starts_here
our_code_starts_here:
  mov rax, 37
  ret
Then we can use the same sequence of commands from before to run the program:
$ nasm -f elf64 test/37.s -o runtime/our_code.o
$ ar rcs runtime/libour_code.a runtime/our_code.o
$ rustc -L runtime/ runtime/start.rs -o test/37.run
$ ./test/37.run
37
We're close to saying we've credibly built a “compiler”, in that we've taken some source program and gone all the way to a generated binary.
The next steps will be to clean up the clumsiness of running 3 post-processing
commands (nasm, ar, and rustc), and then adding some nontrivial
functionality.
Cleaning up with a Makefile
There are a lot of thing we could do to try and assemble and run the program,
and we'll discuss some later in the course. For now, we'll simply tidy up our
workflow by creating a Makefile that runs through the compile-assemble-link
steps for us. Put these rules into a file called Makefile in the root of the
repository (use elf64 on Linux):
test/%.s: test/%.snek src/main.rs
	cargo run -- $< test/$*.s

test/%.run: test/%.s runtime/start.rs
	nasm -f macho64 test/$*.s -o runtime/our_code.o
	ar rcs runtime/libour_code.a runtime/our_code.o
	rustc -L runtime/ runtime/start.rs -o test/$*.run
(Note that make requires tabs not spaces, but we can only use spaces on the
website, so please replace the four spaces indentation with tab characters when
you copy it -- or copy it from Github.)
And then you can run just make test/<file>.run to do the build steps:
$ make test/37.run
cargo run -- test/37.snek test/37.s
    Finished dev [unoptimized + debuginfo] target(s) in 0.07s
     Running `target/x86_64-apple-darwin/debug/adder test/37.snek test/37.s`
nasm -f macho64 test/37.s -o runtime/our_code.o
ar rcs runtime/libour_code.a runtime/our_code.o
rustc -L runtime/ runtime/start.rs -o test/37.run
The cargo run command will re-run if the .snek file or the compiler
(src/main.rs) change, and the assemble-and-link commands will re-run if the
assembly (.s file) or the runtime (runtime/start.rs) change.
Adding Nontrivial Language Features
The overall syntax for the Adder language admits many more features than just
numbers. With the definition of Adder above, we can have programs like (add1 (sub1 6)), for example. There can be any numbers of layers of nesting of the
parentheses, which means we need to think about parsing a little bit more.
We're going to design our syntax carefully to avoid thinking too much about parsing, though. The parenthesized style of Adder is a subset of what's called s-expressions. The Scheme and Lisp family of languages are some of the more famous examples of languages built in s-expressions, but recent ones like WebAssembly also use this syntax, and it's a common choice for language development to simplify decision around syntax, which can become quite tricky and won't be our focus in this course.
A grammar for s-expressions looks something like:
s-exp := number
       | symbol
       | string
       | ( <s-exp>* )
That is, an s-expression is either a number, symbol (think of symbol like an identifier name), string, or a parenthesized sequence of s-expressions. Here are some s-expressions:
(1 2 3)
(a (b c d) e "f" "g")

(hash-table ("a" 100) ("b" 1000) ("c" 37"))

(define (factorial n)
  (if (== n 1)
      1
      (factorial (* n (- n 1)))))

(class Point
  (int x)
  (int y))

(add1 (sub1 37))
One attractive feature of s-expressions is that most programming languages have
libraries for parsing them. There are several crates available for parsing
s-expressions in Rust. You're free to pick another one if you like it, but I'm
going to use sexp because its type definitions
work pretty well with pattern-matching and I find that helpful.
(lexpr also looks interesting, but the
Value type is really clumsy with pattern matching so it's not great for this
tutorial.)
We can add ths package to our project by adding it to Cargo.toml, which was
created when you used cargo new. Make it so your Cargo.toml looks like this:
[package]
name = "adder"
version = "0.1.0"
edition = "2021"

[dependencies]
sexp = "1.1.4"
Then you can run cargo build and you should see stuff related to the sexp
crate be downloaded.
We can then use it in our program like this:
use sexp::*;
use sexp::Atom::*;
Then, a function call like this can turn a string into a Sexp:
let sexp = parse("(add1 (sub1 (add1 73)))").unwrap()
(As a reminder, the .unwrap() is our way of telling Rust that we are trusting
this parsing to succeed, and we'll panic! and stop the program if the parse
doesn't succeed. We will talk about giving better error messages in these cases
later.)
Our goal, though, is to use a datatype that we design for our expressions, which we introduced as:
enum Expr {
    Num(i32),
    Add1(Box<Expr>),
    Sub1(Box<Expr>),
}
So we should next write a function that takes Sexps and turns them into
Exprs (or gives an error if we give an s-expression that doesn't match the
grammar of Adder). Here's a function that will do the trick:
fn parse_expr(s: &Sexp) -> Expr {
    match s {
        Sexp::Atom(I(n)) => Expr::Num(i32::try_from(*n).unwrap()),
        Sexp::List(vec) => {
            match &vec[..] {
                [Sexp::Atom(S(op)), e] if op == "add1" => Expr::Add1(Box::new(parse_expr(e))),
                [Sexp::Atom(S(op)), e] if op == "sub1" => Expr::Sub1(Box::new(parse_expr(e))),
                _ => panic!("parse error"),
            }
        },
        _ => panic!("parse error"),
    }
}
(A Rust note – the parse_expr function takes a reference to Sexp (the type
&Sexp) which means parse_expr will have read-only, borrowed access to some
Sexp that was allocated and stored somewhere else.)
This uses Rust pattern matching to match the specific cases we care about
for Adder – plain numbers and lists of s-expressions. In the case of lists, we
match on two the two specific cases that look like add1 or sub1 followed by
some other s-expression. In those cases, we recursively parse, and use
Box::new to match the signature we set up in enum Expr.
So we've got a way to go from more structure text—s-expressions—stored in
files and produce our Expr structure. Now we just need to go from the Expr
ASTs to generated assembly. Here's one way to do that:
fn compile_expr(e: &Expr) -> String {
    match e {
        Expr::Num(n) => format!("mov rax, {}", *n),
        Expr::Add1(subexpr) => compile_expr(subexpr) + "\nadd rax, 1",
        Expr::Sub1(subexpr) => compile_expr(subexpr) + "\nsub rax, 1",
    }
}
And putting it all together in main:
fn main() -> std::io::Result<()> {
    let args: Vec<String> = env::args().collect();

    let in_name = &args[1];
    let out_name = &args[2];

    let mut in_file = File::open(in_name)?;
    let mut in_contents = String::new();
    in_file.read_to_string(&mut in_contents)?;

    let expr = parse_expr(&parse(&in_contents).unwrap());
    let result = compile_expr(&expr);
    let asm_program = format!("
section .text
global our_code_starts_here
our_code_starts_here:
  {}
  ret
", result);

    let mut out_file = File::create(out_name)?;
    out_file.write_all(asm_program.as_bytes())?;

    Ok(())
}
Then we can write tests like this add.snek:
$ cat test/add.snek
(sub1 (sub1 (add1 73)))
And run our whole compiler end-to-end:
$ make test/add.run
cargo run -- test/add.snek test/add.s
    Finished dev [unoptimized + debuginfo] target(s) in 0.02s
     Running `target/x86_64-apple-darwin/debug/adder test/add.snek test/add.s`
nasm -f macho64 test/add.s -o runtime/our_code.o
ar rcs runtime/libour_code.a runtime/our_code.o
rustc -L runtime/ runtime/start.rs -o test/add.run
$ cat test/add.s

section .text
global our_code_starts_here
our_code_starts_here:
  mov rax, 73
add rax, 1
sub rax, 1
sub rax, 1
  ret
$ ./test/add.run
72
This is, of course, a very simple language. This tutorial serves mainly to make us use all the pieces of infrastructure that we'll build on throughout the quarter:
- An assembler (
nasm) and a Rust main program (runtime/start.rs) to build binaries - A definition of abstract syntax (
enum Expr) - A parser for text (
parsefrom thesexpcrate) and a parser for our abstract syntax (parse_expr) - A code generator (
compile_expr) that generates assembly fromExprs
Another Approach: Jumping Straight To It
The compiler you implemented above is a traditional ahead of time compiler.
Many language systems work this way (it's what rustc, gcc, and clang do,
for instance), but many modern systems also generate machine code directly from
the process that runs the compiler, and the compiler's execution can be
interleaved with program execution. This isn't a new
idea: Smalltalk and LISP are
early examples of languages built atop runtime code generation.
JavaScript
engines in web browsers are likely the most
high-profile implementations of JITs.
Rust, with detailed control over memory and a broad package system, provides a pretty good environment for doing this kind of runtime code generation. In each assignment in the course, we will also explore a dynamic, just-in-time feature that goes with what we are currently studying. This will give a hands-on view into a whole other class of runtime systems for programming languages (like the one running in the browser you are using to read this!).
$ cargo run -- test/add.snek test/add.s
72 # prints result directly in addition to writing assembly file
Generating Machine Code Dynamically
A fundamental tool a JIT needs is the ability to generate machine code, and jump to it, at runtime. That means allocating not just new memory, but new executable memory containing fully assembled instructions.
This is a nontrivial extra step – above we used nasm to take strings of
assembly and generate appropriate machine code representations that resolve
labels, encode instructions, and so on. Thankfully, this is a task that many
programmers care about, and there are libraries for doing this. The one we will
use is called dynasm, which is
built on a long history of APIs for runtime code generation.
We can add dynasm to our project by adding these lines to the [dependencies]
section of our Cargo.toml:
dynasm = "2.0.0"
dynasmrt = "2.0.0"
And we can import it into our Rust code in main.rs with
use dynasmrt::{dynasm, DynasmApi};
Then we can use it in our main to do the work we need. First, we create a new
Assembler
instance. This is a dynasm concept: we will add a sequence of instructions to
the Assembler and later ask dynasm to turn them into machine code. We also
store start, which is a pointer to the beginning of the newly-generated
machine code.
let mut ops = dynasmrt::x64::Assembler::new().unwrap();
let start = ops.offset();
Then, we need to compile the code, but instead of generating just a string, we
have to use dynasm's special API to append the instructions to ops one at a time.
For this tutorial, we'll just write a new top-level function:
fn compile_ops(e : &Expr, ops : &mut dynasmrt::x64::Assembler) {
    match e {
        Expr::Num(n) => { dynasm!(ops ; .arch x64 ; mov rax, *n); }
        Expr::Add1(subexpr) => {
            compile_ops(&subexpr, ops);
            dynasm!(ops ; .arch x64 ; add rax, 1);
        }
        Expr::Sub1(subexpr) => {
            compile_ops(&subexpr, ops);
            dynasm!(ops ; .arch x64 ; sub rax, 1);
        }
    }
}
The dynasm! macro lets us write close-to-x86 syntax, and handles the details
internally about instruction encoding.
Then in our running main, we can add:
compile_ops(&expr, &mut ops);
And finally, use dynasm! again to add the ret statement. Then we
finalize()
the assembler, which gives us back a buffer with the raw executable memory.
Then we can use an unsafe cast with mem::transmute to ask Rust to treat a
pointer to the start of that buffer as a C function, and call it!
dynasm!(ops ; .arch x64 ; ret);
let buf = ops.finalize().unwrap();
let jitted_fn: extern "C" fn() -> i64 = unsafe { mem::transmute(buf.ptr(start)) };
let result = jitted_fn()
println!("{}", result);
We can add this code along with the code we had before to put the generated
assembly into the .s file, and then when we run with cargo run we'll see the
direct output and the created assembly file.
In this step, if you're on an ARM Mac, you may get an “illegal instruction” error. This is because the default target for Rust is ARM, and we can't mix the instruction types within one process. On a mac, use:
cargo run --target x86_64-apple-darwin -- test/72.snek test/72.s
That will make the compiler be an x86_64 binary, so your Mac will start the
process in the right mode for
Rosetta to kick in.
Your TODOs
- Do the whole tutorial above, creating the project repository as you go. Write several tests to convince yourself that things are working as expected.
- Then, add support for
negateas described in the beginning, and write several tests fornegateas well. - In your terminal, demonstrate your compiler working on at least 5 different
examples by using
caton a sourcesnekfile, then showingmakerunning, usingcaton the resulting.sfile, and then running the resulting binary. Copy this interaction into a file calledtranscript.txt. For each example, make sure it works both compiling the file ahead of time and dynamically assembling the code and jumping directly to it (e.g. the result should print directly and it should make the assembly file).
Hand in your entire repository to the assignment-1-tutorial assignment on
Gradescope. There is no automated grading for this assignment; we want you to
practice gaining your own confidence that your solution works (and
demonstrating that to us).

Week 2 + 3: HydraBoa (-e and -c due October 8, -i due October 15)
In this assignment you'll implement a compiler for a small language called Boa and extend it with dynamic features. We'll call the language Boa and the whole runtime system and CLI tooling HydraBoa. The main features are let bindings and binary operators. The key difference between this language and what we implemented in class is that there can be multiple variables defined within a single let. This language implementation has three modes, Ahead-of-Time (AOT), Just-in-Time (JIT), and an interactive REPL mode.
- Part 1: Supporting the Boa Language and AOT compilation of Boa files with a generated assembly file. This is with the
-ccompile flag to the main program. - Part 2: JIT compilation of Boa files with an evaluation at runtime, using dynasm. This is with the
-eeval flag to the main program.- The
-gflag prints the evaluation and writes out AOT assembly for debugging purposes.
- The
- Part 3: A REPL for Boa. This is with the
-iinteractive flag to the main program.
(It's common for languages to have multiple implementations and different
tooling depending on the implemenation. For example JavaScript is a language,
while NodeJS and V8 are implementations
of JavaScript with various features, CLI options, etc. The same can be said
for Python, where CPython and
PyPy are both implementations with their own features and
quirks. Same for Java and OpenJDK versus OracleJDK, C and clang vs gcc, and
so on. So Boa is the language – its syntax and definition of what it's
supposed to do. HydraBoa is our full implementation with its own CLI tooling,
etc.)
Setup
Get the assignment at https://classroom.github.com/a/RfezDfWu. This will make a private-to-you copy of the repository hosted within the course's organization. You can also access the public testing infrastructure code directly from this public URL.
Part 1: The Boa Language
In each of the next several assignments, we'll introduce a language that we'll implement. We'll start small, and build up features incrementally. We're starting with Boa, which has just a few features – defining variables, and primitive operations on numbers. Part 1 is about making an Ahead-of-Time (AOT) compiler for the Boa Language.
There are a few pieces that go into defining a language for us to compile:
- A description of the concrete syntax – the text the programmer writes.
- A description of the abstract syntax – how to express what the programmer wrote in a data structure our compiler uses.
- A description of the behavior of the abstract syntax, so our compiler knows what the code it generates should do.
Concrete Syntax
The concrete syntax of Boa is:
<expr> :=
  | <number>
  | <identifier>
  | (let (<binding> +) <expr>)
  | (add1 <expr>)
  | (sub1 <expr>)
  | (+ <expr> <expr>)
  | (- <expr> <expr>)
  | (* <expr> <expr>)

<binding> := (<identifier> <expr>)
Here, a let expression can have one or more bindings (that's what the
<binding> + notation means). <number>s are in base 10 and must be
representable as an i32. <identifier>s are names and should be limited to
alphanumeric characters, hyphens, and underscores, and should start with a
letter. (The sexp library handles more than this, but this keeps things
nicely readable.)
Abstract Syntax
The abstract syntax of Boa is a Rust enum. Note that this
representation is different from what we used in
Adder.
enum Op1 {
    Add1,
    Sub1
}

enum Op2 {
    Plus,
    Minus,
    Times
}

enum Expr {
    Number(i32),
    Id(String),
    Let(Vec<(String, Expr)>, Box<Expr>),
    UnOp(Op1, Box<Expr>),
    BinOp(Op2, Box<Expr>, Box<Expr>)
}
Semantics
A "semantics" describes the languages' behavior without giving all of the assembly code for each instruction.
A Boa program always evaluates to a single integer.
- Numbers evaluate to
themselves (so a program just consisting of
Number(5)should evaluate to the integer5). - Unary operator expressions perform addition or subtraction by one on
their argument. If the result wouldn't fit in an
i32, the program can have any behavior (e.g. overflow withadd1or underflow withsub1). - Binary operator expressions evaluate their arguments and combine them
based on the operator. If the result wouldn't fit in an
i32, the program can have any behavior (e.g. overflow or underflow with+/-/*). - Let bindings should use lexical scoping: evaluate all the binding expressions to values one by one, and after each, store a mapping from the given name to the corresponding value in both (a) the rest of the bindings, and (b) the body of the let expression. Identifiers evaluate to whatever their current stored value is.
There are several examples further down to make this concrete.
The compiler should stop and report an error if:
- There is a binding list containing two or more bindings with the same name. The error should contain the string
"Duplicate binding" - Shadowing with nested let binds are allowed.
"Duplicate binding"panics are only when there are duplicates within the same bindings list of a let. Example:(let ((x 3)) (let ((x 1)) x))results in1becausexis shadowed; it is not a duplicate binding.(let ((y 3) (y 8)) 777)is a"Duplicate binding"error. - An identifier is unbound (there is no surrounding let binding for it) The error should contain the string
"Unbound variable identifier {identifier}"(where the actual name of the variable is substituted for{identifier})
If there are multiple errors, the compiler can report any non-empty subset of them.
Here are some examples of Boa programs. In the "Abstract Syntax" parts, we
assume that the program has appropriate use statements to avoid the Expr::
and other prefixes in order to write the examples compactly.
Example 1
Concrete Syntax
5
Abstract Syntax
Number(5)
Result
5
Example 2
Concrete Syntax
(sub1 (add1 (sub1 5)))
Abstract Syntax
UnOp(Sub1, Box::new(UnOp(Add1, Box::new(UnOp(Sub1, Box::new(Number(5)))))))
Result
4
Example 3
Concrete Syntax
(let ((x 5)) (add1 x))
Abstract Syntax
Let(vec![("x".to_string(), Number(5))],
  Box::new(UnOp(Add1, Box::new(Id("x".to_string())))))
Result
6
More examples
(sub1 5)
# as an expr
UnOp(Sub1, Box::new(Number(5)))
# evaluates to
4
(let ((x 10) (y 7)) (* (- x y) 2))
# as an expr
Let(vec![("x".to_string(), Number(10)), ("y".to_string(), Number(7))],
    Box::new(BinOp(Times, Box::new(BinOp(Minus, Box::new(Id("x".to_string())),
                          Box::new(Id("y".to_string())))), Box::new(Number(2)))));
# evaluates to
6
Implementing an AOT Compiler for Boa
You have a starter codebase from Adder that has several pieces of infrastructure:
- A main program (
main.rs) that uses the parser and compiler to produce assembly code from an input Boa text file. - A
Makefileand a runner (runtime/start.rs) that you can modify from Adder. You may modify yourMakefileto add new commands. - You will add your own tests by creating new .snek files in the
tests/directory and compiling them like we did in Adder, but with an extra argument (-c) to specifycargo run -c in.snek out.s. - To speed up the testing, you can write your own automated unit testing infrastructure in the
tests/directory.
Writing the Parser
The parser will be given a S-expression representing the whole program, and
must build a AST of the Expr data type from this S-expression.
An S-expression in Rust is of the following type:
pub enum Sexp {
    Atom(Atom),
    List(Vec<Sexp>),
}
pub enum Atom {
    S(String),
    I(i64),
    F(f64),
}
Thus, an example S-expression that could be parsed into a program would be as follows
List(vec![Atom("let"), List(vec![List(vec![Atom("x"), Atom("5")])]), Atom("x")])
which corresponds to
(let ((x 5)) x)
in Boa or
{
    let x = 5;
    x
}
in Rust.
This should then parse to the AST
Let(vec![("x".to_string(), Number(5))], Id("x".to_string()))
which can then be compiled.
Since most S-expressions are lists, you will need to check the first element of
the list to see if the operation to perform is a let, add1, *, and so on.
If an S-expression is of an invalid form, (i.e. a let with no body, a +
with three arguments, etc.) panic with a message containing the string
"Invalid".
You can assume that an id is a valid string of form [a-zA-z][a-zA-Z0-9]*.
You will, however, have to check that the string does not match any of
the language's reserved words, such as let, add1, and sub1.
The parsing should be implemented in
fn parse_expr(s: &Sexp) -> Expr {
    todo!("parse_expr");
}
You can also implement a helper function parse_bind
fn parse_bind(s: &Sexp) -> (String, Expr) {
    todo!("parse_bind");
}
which may be helpful for handling let expressions.
Writing the AOT Compiler
The primary task of writing the Boa compiler is simple to state: take an
instance of the Expr type and turn it into a list of assembly
instructions. Start by defining a function that compiles an expression into a
list of instructions:
fn compile_to_instrs(e: &Expr) -> Vec<Instr> {
    todo!("compile_to_instrs");
}
which takes an Expr value (abstract syntax) and turns it into a list of
assembly instructions, represented by the Instr type. Use only the
provided instruction types for this assignment; we will be gradually expanding
this as the quarter progresses. The compiled Instr vector can be translated into both a string representation of the assembly code and dynasm instructions for Part 2's JIT compilation.
Note: For variable bindings, we used im::HashMap<String, i32> from the
im crate.
We use the immutable HashMap here to make nested scopes easier because we
found it annoying to remember to pop variables when you leave a scope.
You're welcome to use any reasonable strategy here.
The other functions you need to implement are:
fn instr_to_str(i: &Instr) -> String {
    todo!("instr_to_str");
}

fn val_to_str(v: &Val) -> String {
    todo!("val_to_str");
}
They render individual instances of the Instr type and Val type into a string
representation of the instruction. This second step is straightforward, but
forces you to understand the syntax of the assembly code you are generating.
Most of the compiler concepts happen in the first step, that of generating
assembly instructions from abstract syntax. Feel free to ask or refer to
on-line resources if you want more information about a particular assembly
instruction!
After that, put everything together with a compile function that compiles an
expression into assembly represented by a string.
fn compile(e: &Expr) -> String {
    todo!("compile");
}
Assembly instructions
The Instr type is defined below. The assembly instructions that
you will have to become familiar with for this assignment are:
-
IMov(Val, Val)— Copies the right operand (source) into the left operand (destination). The source can be an immediate argument, a register or a memory location, whereas the destination can be a register or a memory location.Examples:
mov rax, rbx mov [rax], 4 -
IAdd(Val, Val)— Add the two operands, storing the result in its first operand.Example:
add rax, 10 -
ISub(Val, Val)— Store in the value of its first operand the result of subtracting the value of its second operand from the value of its first operand.Example:
sub rax, 216 -
IMul(Val, Val)— Multiply the left argument by the right argument, and store in the left argument (typically the left argument israxfor us)Example:
imul rax, 4
Running
With the -c flag, run cargo run -- -c test.snek test.s to compile your snek file into assembly. You can modify your Makefile to add a command to do this for you.
$ cargo run -- -c test/add1.snek test/add1.s
$ cat test/add1.s

section .text
global our_code_starts_here
our_code_starts_here:
  mov rax, 131
  ret
To actually evaluate your assembly code, we need to link it with runtime.rs to
create an executable. This is covered in the Makefile from Adder.
$ make test/add1.run
nasm -f elf64 test/add1.s -o runtime/our_code.o
ar rcs runtime/libour_code.a runtime/our_code.o
rustc -L runtime/ runtime/start.rs -o test/add1.run
Finally you can run the file by executing to see the evaluated output:
$ ./test/add1.run
131
- Note: Locally on arm macs, to target with Rosetta 2, you need to use:
cargo run --target x86_64-apple-darwin -- -c test.snek test.s
and
nasm -f macho64
ar rcs runtime/libour_code.a runtime/our_code.o
rustc --target x86_64-apple-darwin -L tests/ -lour_code:$* runtime/start.rs -o tests/$*.run
OR you can simply add a new directory and file .cargo/config.toml with the following contents:
[build]
target = "x86_64-apple-darwin"
And run all commands normally.
Part 2: Dynamic Compilation
Now that you have an AOT compiler with all of the Boa language features, you can use it to generate machine code and execute it at runtime. Just like in Adder, you will use the dynasm crate to generate machine code at runtime.
The dynasm crate provides macros that allow you to write assembly-like code that gets compiled into a vector of bytes representing machine instructions. You can then execute this machine code by casting it to a function pointer using mem::transmute. This is exactly how you evaluate the Boa program directly without generating an assembly file or linking it to runtime.rs!
Writing the JIT Compiler
Notice how we used the Instr type to represent assembly instructions in Part 1. This abstraction is useful for generating assembly code as a string. But how about for JIT compilation, where we need to generate machine code directly with dynasm's macros? Using a vector of Instr, instead of generating strings, is it possible to generate machine code directly? It may be useful to have a function like this:
fn instr_to_asm(i: &Instr, ops: &mut dynasmrt::x64::Assembler) {
    todo!("instr_to_asm");
}
Ideally, it would be nice to generate dynasm from all possible instructions; you may find it useful to restrict it to just instructions that you expect your compiler to produce. This may involve a lot of boilerplate; it's a good place to see if a LLM can do some boring work for you.
Although this is one approach, feel free to use any strategy you would like!
Running
Now with the -e flag, run cargo run -- -e test.snek to compile your snek file and directly execute it. You can modify your Makefile to also include this command.
$ cargo run -- -e test/add1.snek
131
Here we have already evaluated our program at runtime! Notice that we did not link it to runtime.rs to create an executable.
We also will include a -g with cargo run -- -g test.snek test.s flag that will do both AOT and JIT compilation. This is for debugging purposes, since we can evaluate Boa code directly at runtime and print out the (hopefully correct) generated assembly that should produce the same evaluation. In all, your AOT and JIT compilers should be producing the same results.
$ cargo run -- -g test.snek test.s
131
$ cat test/add1.s

section .text
global our_code_starts_here
our_code_starts_here:
  mov rax, 131
  ret
Notice how it both evaluates our program and writes to test.s.
- Note: Locally on arm macs, make sure to target the correct architecture for dynasm also with
--target x86_64-apple-darwin.
Part 3: REPL (Hydra)
A REPL stands for Read, Evaluate, Print, Loop. This is where our JIT compiler shines, and we will be iteratively improving upon this for our next assignments.
Writing the REPL
With the io library, we can read input from the user. We can then parse the input into an Expr, compile it to machine code, and execute it at runtime. Finally, we print the result and loop back to reading input from the user again.
You may want to reuse your dynasmrt::x64::Assembler from the previous prompt instead of reinitilizing it each prompt. This is not required for now, but will be incredibly useful for the next assignments. Below is the same way to execute dynasm code without deconstructing the Assembler ops.
let start = ops.offset();

... // code gen with dynasm

dynasm!(ops ; .arch x64 ; ret);
// instead of finalize(), we commit()
ops.commit().unwrap();
let reader = ops.reader();
let buf = reader.lock();
let jitted_fn: extern "C" fn() -> i64 = unsafe { mem::transmute(buf.ptr(start)) };
let result = jitted_fn();
// Ownership for ops can continue!
Notice how we get a reader from the Assembler. This is our thread safe method for reading our executable memory buffer. Remember to update your start offset before new code generation to mark where the new executable code begins!
Here are some requirements for our REPL:
- A prompt for our user (maybe
>or$or anything else you would like to customize). - If we ever encounter an error, we will print out the error message and continue the loop. This means we need graceful error handling in our REPL.
exitorquitwill exit the REPL.- New type
definefor defining top-level variables across multiple prompts. This can be extended from Expr, or your own REPL type (maybe likeReplEntryfrom class).
The Define Statement
Define(String, Box<Expr>)
Our new type, define, is something unique to the REPL. The expression (define x expr) will define a top-level variable x to be the result of evaluating expr. This variable can then be used in future REPL prompts.
definewill be top-level only. Otherwise, return an error message containing the string"Invalid".- We cannot redefine the same variable twice. If we try to do so, we will print out an error message containing the string
"Duplicate binding". - We can shadow
defined variables in nested scopes withletexpressions. - You must store
defined variable immediate values on the heap somewhere and then refer to it immediately when compiling theId. This is an optimiation so we do not use the stack.
Running
With the -i flag, run cargo run -- -i to enter the REPL. You can then type in Boa expressions and see their evaluated results immediatley. Rather than input/output files, we specify -i for interactive.
$ cargo run -- -i
> (let ((x 5)) (+ x 10))
15
> (define x (add1 46))  // nothing is printed
> x
47
> (+ x 4)
51
> (define x 100)   // error but no exit
Duplicate binding
> (let ((x 10)) x)   // shadowing
10
> (hello           // parse error but no exit
Invalid: parse error
> quit
- Note: Locally on arm macs, make sure to target the correct architecture (and keep an eye on if your
cargo testis doing the same)!
Ignoring or Changing the Starter Code
You can change a lot of what we describe above; it's a (relatively strong) suggestion, not a requirement. You might have different ideas for how to organize your code or represent things. That's a good thing! What we've shown in class and this writeup is far from the only way to implement a compiler.
To ease the burden of grading, we ask that you keep the following in mind: we
will grade your submission (in part) by copying our own tests/ directory in
place of the one you submit and running with all 4 flags:
cargo run -- -c tests/test1.snek tests/test1.s
cargo run -- -e tests/test1.snek
cargo run -- -g tests/test1.snek tests/test1.s
cargo run -- -i
And producing corresponding executable files and outputs from generated assembly.
It doesn't rely on any of the data definitions or function signatures in
src/main.rs. So with that constraint in mind, feel free to make new
architectural decisions yourself.
Strategies, and FAQ
Working Incrementally
If you are struggling to get started, here are a few ideas:
- Try to tackle features one at a time. For example, you might completely ignore let expressions at first, and just work on addition and numbers to start. Then you can work into subtraction, multiplication, and so on.
- Some features can be broken down further. For example, the let expressions in this assignment differ from the ones in class by having multiple variables allowed per let expression. However, you can first implement let for just a single variable (which will look quite a bit like what we did in class!) and then extend it for multiple bindings.
- Use git! Whenver you're in a working state with some working tests, make a commit and leave a message for yourself. That way you can get back to a good working state later if you end up stuck.
- For AOT compilation, first check if your generated
.sassembly is equivalent to theInstrvector, and for JIT, check if yourInstrinstructions are pattern matched correctly. Make sure you call the dynasm conventions from Adder correctly.
FAQ
What should (let ((x 5) (z x)) z) produce?
From the PA writeup: “Let bindings should evaluate all the binding expressions to values one by one, and after each, store a mapping from the given name to the corresponding value in both (a) the rest of the bindings, and (b) the body of the let expression. Identifiers evaluate to whatever their current stored value is.”
Do Boa programs always have the extra parentheses around the bindings?
In Boa, there's always the extra set of parens around the list.
Can we write additional helper functions?
Yes.
Do we care about the text return from panic?
Absolutely. Any time you write software you should strive to write thoughtful error messages. They will help you while debugging, you when you make a mistake coming back to your code later, and anyone else who uses your code.
As for the autograder, we expect you to catch parsing and compilation errors. For parsing errors you should panic! an error message containing the word Invalid. For compilation errors, you should catch duplicate binding and unbound variable identifier errors and panic! Duplicate binding and Unbound variable identifier {identifier} respectively. We've also added these instructions to the PA writeup.
How should we check that identifiers are valid according to the description in the writeup?
From the PA writeup: “You can assume that an id is a valid string of form [a-zA-z][a-zA-Z0-9]*. You will, however, ...”
Assume means that we're not expecting you to check this for the purposes of the assignment (though you're welcome to if you like).
What should the program () compile to?
Is () a Boa program (does it match the grammar)? What should the compiler do with a program that doesn't match the grammar?
What's the best way to test? What is test case
A few suggestions:
- First, make sure to test all the different expressions as a baseline
- Then, look at the grammar. There are lots of places where
<expr>appears. In each of those positions, any other expression could appear. Soletcan appear inside+and vice versa, and in the binding position of let, and so on. Make sure you've tested enough nested expressions to be confident that each expression works no matter the context - Names of variables are interesting – the names can appear in different places and have different meanings depending on the structure of let. Make sure that you've tried different combinations of
letnaming and uses of variables.
My tests non-deterministically fail sometimes
You are probably running cargo test instead of cargo test -- --test-threads 1. The testing infrastructure interacts with the file system in a way that can cause data races when tests run in parallel. Limiting the number of threads to 1 will probably fix the issue.
Grading
Update: To expedite grading and review, we're adding a new constraint.
Your solution must be able to run cargo test. You can use our testing
infrastructure
https://github.com/ucsd-cse131-fa25/test-starter,
or use your own. However, you must be able to:
- Run
cargo testto run multiple test files - Make it clear in the README how we can add a new test that will be run with
cargo test
This matches Rust development practices and makes it a lot easier for us to review your submission.
We'll combine our own tests with some amount of manual grading involving
looking at your testing and implementation strategy. You should have your own
thorough test suite (it's not unreasonable to write many dozens of tests; you
probably don't need hundreds), and you need to have recognizably implemented a
compiler. For example, you could try to calculate the answer for these
programs and generate a single mov instruction: don't do that, it doesn't
demonstrate the learning outcomes we care about.
Any credit you lose will come with instructions for fixing similar mistakes on future assignments.
Happy hacking!

Week 4: Cobra, Due Wednesday, October 22
In this assignment you'll implement a compiler for a small language called Cobra, which extends Boa with booleans, conditionals, variable assignment, and loops.
Setup
Get the assignment at https://classroom.github.com/a/hQU87gZn This will make a private-to-you copy of the repository hosted within the course's organization. You can also access the public test + 'starter' code https://github.com/ucsd-cse131-fa25/cobra-test if you don't have or prefer not to use a Github account.
Note: the repository has no real code, just a basic project structure. Feel free to add files and modify them, or even replace them entirely and start from your Boa code. Make sure your code can do cargo build and cargo test on ieng6 (Rust version 1.75).
- Part 1: AOT compilation of Cobra files with a generated assembly file. This is with the
-ccompile flag. The optional argument is only given to the executable.runfile. - Part 2: JIT compilation of Cobra files with an evaluation at runtime. This is with the
-eeval flag with an optional argument.- The
-gflag does both (with an optional argument).
- The
- Part 3: A REPL for Cobra with the
-iinteractive flag.
cargo run -- -c tests/test1.snek tests/test1.s
cargo run -- -e tests/test1.snek <optionalArg>
cargo run -- -g tests/test1.snek tests/test1.s <optionalArg>
cargo run -- -i
Part 1: The Cobra Language
Concrete Syntax
The concrete syntax of Cobra is:
<expr> :=
  | <number>
  | true
  | false
  | input
  | <identifier>
  | (let (<binding>+) <expr>)
  | (<op1> <expr>)
  | (<op2> <expr> <expr>)
  | (set! <name> <expr>)
  | (if <expr> <expr> <expr>)
  | (block <expr>+)
  | (loop <expr>)
  | (break <expr>)

<op1> := add1 | sub1 | isnum | isbool
<op2> := + | - | * | < | > | >= | <= | =

<binding> := (<identifier> <expr>)
true and false are literals. Names used in let cannot have the name of
other keywords or operators (like true or false or let or block).
Numbers should be representable as a signed 63-bit number (e.g. from
-4611686018427387904 to 4611686018427387903).
Abstract Syntax
You can choose the abstract syntax you use for Cobra. We recommend something like this:
enum Op1 { Add1, Sub1, IsNum, IsBool, }

enum Op2 { Plus, Minus, Times, Equal, Greater, GreaterEqual, Less, LessEqual, }

enum Expr {
    Number(i64),
    Boolean(bool),
    Id(String),
    Let(Vec<(String, Expr)>, Box<Expr>),
    UnOp(Op1, Box<Expr>),
    BinOp(Op2, Box<Expr>, Box<Expr>),
    If(Box<Expr>, Box<Expr>, Box<Expr>),
    Loop(Box<Expr>),
    Break(Box<Expr>),
    Set(String, Box<Expr>),
    Block(Vec<Expr>),
}
Semantics
A "semantics" describes the languages' behavior without giving all of the assembly code for each instruction.
A Cobra program always evaluates to a single integer, a single boolean, or ends
with an error. When ending with an error, it should print a message to
standard error (eprintln! in Rust works well for this) and a non-zero exit
code (std::process::exit(N) for nonzero N in Rust works well for this).
inputexpressions evaluate to the first command-line argument given to the program. The command-line argument can be any Cobra value: a valid number ortrueorfalse. If no command-line argument is provided, the value ofinputisfalse. When running the program the argument should be provided astrue,false, or a base-10 number value.- All Boa programs evaluate in the same way as before, with one
exception: if numeric operations would overflow a 63-bit integer, the program
should end in error, reporting
"overflow"as a part of the error. - If the operators other than
=are used on booleans, an error should be raised from the running program, and the error should contain "invalid argument". Note that this is not a compilation error, nor can it be in all cases due toinput's type being unknown until the program starts.- Assembly can get cumbersome to read with type checks. It might be useful to have a custom
Instrthat simply serves as an assembly comment.
- Assembly can get cumbersome to read with type checks. It might be useful to have a custom
- The relative comparison operators like
<and>evaluate their arguments and then evaluate totrueorfalsebased on the comparison result. - The equality operator
=evaluates its arguments and compares them for equality. It should raise an error if they are not both numbers or not both booleans, and the error should contain "invalid argument" if the types differ. - Boolean expressions (
trueandfalse) evaluate to themselves ifexpressions evaluate their first expression (the condition) first. If it'sfalse, they evaluate to the third expression (the “else” block), and to the second expression if any other value (including numbers).blockexpressions evaluate the subexpressions in order, and evaluate to the result of the last expression. Blocks are mainly useful for writing sequences that includeset!, especially in the body of a loop.set!expressions evaluate the expression to a value, and change the value stored in the given variable to that value (e.g. variable assignment). Theset!expression itself evaluates to the new value. If there is no surrounding let binding (or in the case of the REPL, no let binding and no previousdefine) for the variable the identifier is considered unbound and an error should be reported.loopandbreakexpressions work together. Loops evaluate their subexpression in an infinite loop untilbreakis used. Break expressions evaluate their subexpression and the resulting value becomes the result of the entire loop. Typically the body of a loop is written withblockto get a sequence of expressions in the loop body.
There are several examples further down to make this concrete.
The compiler should stop and report an error if:
- There is a binding list containing two or more bindings with the same name.
The error should contain the string
"Duplicate binding" - An identifier is unbound (there is no surrounding let binding for it) The
error should contain the string
"Unbound variable identifier {identifier}"(where the actual name of the variable is substituted for{identifier}) - A
breakappears outside of any surroundingloop. The error should contain "break" - An invalid identifier is used (it matches one of the keywords). The error should contain "keyword"
If there are multiple errors, the compiler can report any non-empty subset of them.
Here are some examples of Cobra programs.
Example 1
Concrete Syntax
(let ((x 5))
     (block (set! x (+ x 1))))
Abstract Syntax Based on Our Design
Let(vec![("x".to_string(), Number(5))],
    Box::new(Block(
      vec![Set("x".to_string(),
               Box::new(BinOp(Plus, Id("x".to_string()),
                                    Number(1)))])))
Result
6
Example 2
(let ((a 2) (b 3) (c 0) (i 0) (j 0))
  (loop
    (if (< i a)
      (block
        (set! j 0)
        (loop
          (if (< j b)
            (block (set! c (sub1 c)) (set! j (add1 j)))
            (break c)
          )
        )
        (set! i (add1 i))
      )
      (break c)
    )
  )
)
Result
-6
Example 3
This program calculates the factorial of the input.
(let
  ((i 1) (acc 1))
  (loop
    (if (> i input)
      (break acc)
      (block
        (set! acc (* acc i))
        (set! i (+ i 1))
      )
    )
  )
)
Implementing a Compiler for Cobra
The starter code makes a few infrastructural suggestions. You can change these as you feel is appropriate in order to meet the specification.
Reporting Dynamic Errors
We've provided some infrastructure for reporting errors via the
snek_error
function in start.rs. This is a function that can be called from the
generated program to report an error. for now we have it take an error code as
an argument; you might find the error code useful for deciding which error
message to print. This is also listed as an extern in the generated
assembly startup
code.
Calculating Input
We've provided a
parse_input
stub for you to fill in to turn the command-line argument to start.rs into a
value suitable for passing to our_code_starts_here. As a reminder/reference,
the first argument in the x86_64 calling convention is stored in rdi. This
means that, for example, moving rdi into rax is a good way to get “the
answer” for the expression input.
Representations
In class we chose representations with 0 as a tag bit for numbers and 1 for
booleans with the values 3 for true and 1 for false. You do not
have to use those, though it's a great starting point and we recommend it. Your
only obligation is to match the behavior described in the specification, and if
you prefer a different way to distinguish types, you can use it. (Keep in mind,
though, that you still must generate assembly programs that have the specified
behavior!)
Running and Testing
The test format changed slightly to require a test name along with a test
file name. This is to support using the same test file with different
command line arguments. You can see several of these in the sample
tests.
Note that providing input is optional. These also illustrate how to check for
errors.
If you want to try out a single file from the command line (and perhaps from a
debugger like gdb or lldb), you can still run them directly from the
command line with:
$ cargo run -- -c test/file.snek test/file.s
$ make file.run
$ ./tests/file.run 1234
where the 1234 could be any valid command-line argument.
As a note on running all the tests, the best option is to use make test,
which ensures that cargo build is run first and independently before cargo test.
Part 2: Dynamic Compilation
Eval
Add a new command-line option, -e, for “eval”, that evaluates a program
directly after compiling it with knowledge of the command-line argument. The
usage should be:
cargo run -- -e file.snek <optionalArg>
That is, you provide both the file and the command-line argument.
(+ 1 input)
For this program, if input is a boolean, we should preserve that the program
throws an error as usual. If no arg is given, just like for AOT compilation, default the argument to false.
For easier debugging of your assembly (since we can't just view dynasm machine code), use the -g flag to generate your dynamic assembly and return your JIT output.
Part 3: The REPL
Getting set! right
Now that we have set!, we need to be careful about how we handle set! for define d variables. Unlike let variables on the stack, we would directly inline the immediate value for define d variables in our assembly. We could easily get the value of define d when matching an Expr::Id based on its immediate value within the Rust runtime (maybe with a HashMap...). Let's see why this might be a problem now.
> (define x (+ 3 4))
Now we have a mapping from {x -> 7} in our Rust runtime. So if we do:
> (+ x 10)
17
> (block (+ 3 x)
         (set! x true)
         (+ 1 x) // Would be wrong to inline the value of x here!
  )              // should be error, but could mistakenly be 8
Notice how x was set! to a boolean mid-expression. If we had inlined the immediate value of x as 7, we would have mistakenly returned 8 instead of an error. The issue is that we don't know what the actual value of x is until after the prompt has run.
So how do we solve this problem?
We cannot directly inline an immediate, and we cannot put this variable on the stack either because we update our RBP each prompt. So what if we use the heap?
The solution here is to inline a reference to the immediate. This can be done with Box of our define d value within our Rust runtime. Then we can inline this raw pointer to a heap allocated value into our assembly. We dereference the pointer into RAX to get the value of the Expr::Id. Allocation only needs to be done once for each define d value if it was ever set! d. Then after running our prompt, d is a known immediate again!
That might be a bit confusing, so let's go through it step-by-step.
You should make a helper function that checks which define d variables are set! (maybe by parsing Sexpr or Expr). If they are set!, allocate a new Box that wraps their current value, and then cast the reference into a raw pointer. This can be done like below:
// For each new define d variable that is also first `set!`
let val: i64 = ???;                      // Current i64 value for d
let boxed = Box::new(val);               // Heap allocated i64
let ptr = Box::into_raw(boxed) as i64;   // Raw pointer as i64
Then, in our generated assembly, we can simply dereference this pointer to get the actual value for define d. Notice that we don't need to know what the actual immediate value is in an environment. We just need to know the associated pointer for define d. So if we reach an Expr::Id for d, we can do:
MOV RAX, <a raw ptr as an i64>
MOV RAX, [RAX]                ; Dereference the pointer
; RAX now has the value of d
What about set!? Unlike let variables, we cannot use the stack. So we need to store our RAX into the memory location of our raw pointer!
So if we reach a (set! d expr) for d, we can do:
; Compile expr into RAX
MOV RCX, <a raw ptr as an i64>
MOV [RCX], RAX
So if we do (block (set! d 7) (add1 d)) where d was previously defined, we can do:
; Compile (set! d 7)
MOV RAX, 14
MOV RCX, <a raw ptr as an i64>
MOV [RCX], RAX
; Compile (add1 d)
MOV RAX, <a raw ptr as an i64>
MOV RAX, [RAX]
ADD RAX, 2
Now, after everything is done, we can map define d into a known value again. We know where the value is (the raw pointer), so how do we dereference it within Rust?
// After the prompt has run...
let boxed = unsafe { Box::from_raw(ptr as *mut i64) };
let val = *boxed;       // Dereference a Box
Here we let Rust manage our i64 value in our heap by passing our raw pointer to a Rust Box, which has all of the nice deconstructing and type invariants with it. However, this code is unsafe because we need to be very sure that our raw pointer is correct and not something we freed before. Rust is really trusting our pointer to not be wrong or malicous here! Finally, we dereference our Box as our (hopefully) new known i64 value for define d.
It might also be a good idea to have an environment of sorts for these define d variables that should tell you when a variable is of a known or unknown value. If known, you can optimize and inline an immediate. If unknown, so you cannot optimize and you have to dereference a pointer.
And that's it! You should now be able to handle set! for define d variables correctly.
Happy hacking!
Extension: Dynamic Type Checking
Using Dynamic Information to Optimize
A compiler for Cobra needs to generate extra instructions to check for booleans
being used in binary operators. We could use a static type-checker to avoid
these, but at the same time, the language is fundamentally dynamic because the
compiler cannot know the type of input until the program starts running
(which happens after it is compiled). This is the general problem that systems
for languages like JavaScript and Python face; it will get worse when we
introduce functions in the next assignment.
However, if our compiler can make use of some dynamic information, we can do better.
There are two instructive optimizations we can make with dynamic information, one for standalone programs and one at the REPL.
Eval: Known Input
With command line:
cargo run -- -e file.snek <inputArg>
And if our file does:
(+ input 1)
When called this way, the compiler should skip any instructions used for checking for errors related to input. For example, for this program, if a number is given as the argument, we could omit all of the tag checking related to the input argument (and since 1 is a literal, we could recover essentially the same compilation as for Boa). However, if our argument is a boolean, this can panic even before we run our machine code.
Repl: Known Define Variables
Similarly, after a define statement evaluates at the REPL, we can know that
variable's tag and use that information to compile future entries. For example,
in this REPL sequence, we define a numeric variable and use it in an operator
later. We could avoid tag checks for x in the later use:
> (define x 7)
> (+ x 10)                      // No number checks
17
> (block (set! x 2) (add1 x))   // Do number checks
> (+ 3 x)                       // No number checks
Remember, if you allow set! on define d variables, their values
could change mid-expression (as we went over above). We don't know what the type is without unrapping the pointer in our Rust runtime. Therefore, we cannot optimize type checks for set! variables, until the prompt ends. But after the prompt has run, we can determine what the value and type of define d is again, so we optimize for future prompts!
Grading
As with the previous assignment, a lot of the credit you get will be based on us running autograded tests on your submission. You'll be able to see the result of some of these on while the assignment is out, but we may have more that we don't show results for until after assignments are all submitted.
We'll combine that with some amount of manual grading involving looking at your
testing and implementation strategy. You should have your own thorough test
suite (it's not unreasonable to write many dozens of tests; you probably don't
need hundreds), and you need to have recognizably implemented a compiler. For
example, you could try to calculate the answer for these programs and
generate a single mov instruction: don't do that, it doesn't demonstrate the
learning outcomes we care about.
Any credit you lose will come with instructions for fixing similar mistakes on future assignments.
FAQ
Some of my tests fail with a No such file or directory error
Use https://github.com/ucsd-cse131-fa25/cobra-test and manually replace your tests/
directory.
What is my assembly even doing?
It might be useful to have a custom Instr which simply serves as an assembly comment, which can print something like ; Type check starts here.
What is my REPL even doing?
Even though you don't use the AOT assembly, you can simply print the string AOT would generate for each prompt of the REPL. Then you can see what is (probably) going on (assuming your JIT and AOT have similar compilation logic). You can also print out your environment of define d variables and their known/unknown values after each prompt.
Discussion
It's worth re-emphasizing that a static type-checker could recover a lot of
this performance, and for Cobra it's pretty straightforward to implement a
type-checker (especially for expressions that don't involve input).
However, we'll soon introduce functions, which add a whole new layer of potential dynamism and unknown types (because of function arguments), so the same principles behind these simple cases become much more pronounced. And a language with functions and a static type system is quite different from a language with functions and no static type system.

Week 4: Caduceus, Due Wednesday, October 29, 11:59 PM
In this assignment, you'll spend time reflecting on, and learning from, the designs you and others chose for PA4, Cobra.
We will make PA4 compilers available to the class. We'll make the review assignments by the end of the day on Wednesday, Oct 29. These are based on the Cobra implementatins uploaded to Gradescope:
Assignment Sheet: https://docs.google.com/spreadsheets/d/1JVrxUOXTJKvv6fQFgpC4W10ut7GpB0Sk3NdkCoXUO7o/edit?usp=sharing
Github Classroom: https://classroom.github.com/a/uS6IyLBg
You will be assigned 2 other compilers to review. Accept the GitHub Classroom to get access to all the repositories.
Your feedback will be shared with the class (including the author of the compiler), so make sure to keep what you write professional and constructive.
Note: You should be hopefully assigned a repo that isn't your own, but if I made a mistake, choose a different compiler to review and note this on the google form!
Tracing the Compiler
For each of the compilers you are reviewing, choose an interesting program that runs successfully on the compiler under review (e.g. they match the correct behavior). Make sure that between both programs you chose, it altogether uses at least two of:
- A loop that runs several times and terminates
- At least 2 different binary operators
inputset!assignment to variables
For each program you chose, show at least two relevant code snippets from the compiler that are critical to its compilation. For example, you might show the data structures used in the type checker, the code generation, and the parsing for a particular expression. Only choose the same snippet of code for both programs if it behaves in an interestingly different way across the two.
For each code snippet, write a sentence of how it relates to different parts of the program you're testing, or a cool way it might be implemented that you haven't thought of.
You can use the same two programs on both compilers if you think they illustrate the behavior well.
This means you should have a total of four code snippets (two per compiler, per two examples).
Bugs, Missing Features, and Design Decisions
For each compiler you are reviewing, choose a program that has different behavior than it should, which can be for either AOT, JIT, or REPL.
-
If a key feature in the program isn't implemented, describe how you would add it to the compiler (see below for how to do this).
-
If it is implemented but produces an error, describe how you could fix the error and make it produce the correct answer (see below for how to do this)
-
If it is implemented but produces the wrong answer, decide if you think this was a reasonable design decision. Describe as appropriate:
- If you think producing this answer instead made certain parts of the compiler design simpler or easier than matching the spec, and identify how.
- If you think it's just a bug, and if so, how to fix it.
- If you think it's a better design decision than what was chosen for Cobra.
-
If you think the compiler perfectly implements Cobra, explain what you tested to reach this conclusion and why you are confident that it does.
This means you should have a total of two examples that might create unexpected behavior from the specification. We recommend you choose -g or the REPL to catch bugs/errors/or differences between all aspects of the compiler, not just only AOT or JIT.
Lessons and Advice
Answer the following questions:
- Identify a decision made in this compiler that's different from yours. Describe one way in which it's a better design decision than you made.
- Identify a decision made in this compiler that's different from yours. Describe one way in which it's a worse design decision than you made.
- What's one improvement you'll make to your compiler based on seeing this one?
- What's one improvement you recommend this author makes to their compiler based on reviewing it?
Handin
You will submit a PDF, first with the pages for your first compiler review and then followed by pages for your second compiler review. Label the submission number of the compiler you reviewed before your review. Please start the review of the second compiler on a new page. (We wish you could submit and label 2 pdfs but Gradescope doesn't allow that).

Week 5: Diamondback, Due Wednesday, Nov 5
In this assignment you'll implement a compiler for a language called Diamondback, which has top-level function definitions.
Get the assignment at https://classroom.github.com/a/FZ2iwp42 This will make a private-to-you copy of the repository hosted within the course's organization. You can also access the public test code https://github.com/ucsd-cse131-fa25/cobra-test if you don't have or prefer not to use a Github account. This is the same test code for Cobra.
Note: the repository has no real code, just a basic project structure. Feel free to add files and modify them, or even replace them entirely and start from your Cobra code. Make sure your code can do cargo build and cargo test on ieng6 (Rust version 1.75).
- Part 1: AOT compilation of Diamondback files with a generated assembly file. This is with the
-ccompile flag. The optional argument is only given to the executable.runfile. - Part 2: JIT compilation of Diamondback files with an evaluation at runtime. This is with the
-eeval flag with an optional argument.- The
-gflag does both (with an optional argument).
- The
- Part 3: A REPL for Diamondback with the
-iinteractive flag.
cargo run -- -c tests/test1.snek tests/test1.s
cargo run -- -e tests/test1.snek <optionalArg>
cargo run -- -g tests/test1.snek tests/test1.s <optionalArg>
cargo run -- -i
Part 1 & 2: The Diamondback Language
Concrete Syntax
The concrete syntax of Diamondback has a significant change from past
languages. It distinguishes top-level declarations from expressions. The new
parts are function definitions, function calls, and the print unary operator.
<prog> := <defn>* <expr>                (new!)
<defn> := (fun (<name> <name>*) <expr>) (new!)
<expr> :=
  | <number>
  | true
  | false
  | input
  | <identifier>
  | (let (<binding>+) <expr>)
  | (<op1> <expr>)
  | (<op2> <expr> <expr>)
  | (set! <name> <expr>)
  | (if <expr> <expr> <expr>)
  | (block <expr>+)
  | (loop <expr>)
  | (break <expr>)
  | (<name> <expr>*)                    (new!)

<op1> := add1 | sub1 | isnum | isbool | print (new!)
<op2> := + | - | * | < | > | >= | <= | =

<binding> := (<identifier> <expr>)
Abstract Syntax
You can choose the abstract syntax you use for Diamondback.
Semantics
A Diamondback program always evaluates to a single integer, a single boolean,
or ends with an error. When ending with an error, it should print a message to
standard error (eprintln! in Rust works well for this) and a non-zero exit
code (std::process::exit(N) for nonzero N in Rust works well for this).
A Diamondback program starts by evaluating the <expr> at the end of the
<prog>. The new expressions have the following semantics:
(<name> <expr>*)is a function call. It first evaluates the expressions to values. Then it evaluates the body of the corresponding function definition (the one with the given<name>) with the values bound to each of the parameter names in that definition.(print <expr>)evaluates the expression to a value and prints it to standard output followed by a\ncharacter. Theprintexpression itself should evaluate to the given value.
There are several examples further down to make this concrete.
The compiler should stop and report an error if:
- There is a call to a function name that doesn't exist
- Multiple functions are defined with the same name
- A function's parameter list has a duplicate name, generating an error with string
Duplicatein the error - There is a call to a function with the wrong number of arguments
inputis used in a function definition (rather than in the expression at the end). It's worth thinking of that final expression as themainfunction or method
If there are multiple errors, the compiler can report any non-empty subset of them.
Here are some examples of Diamondback programs.
Example 1
(fun (fact n)
  (let
    ((i 1) (acc 1))
    (loop
      (if (> i n)
        (break acc)
        (block
          (set! acc (* acc i))
          (set! i (+ i 1))
        )
      )
    )
  )
)
(fact input)
Example 2
(fun (isodd n)
  (if (< n 0)
      (isodd (- 0 n))
      (if (= n 0)
          false
          (iseven (sub1 n))
      )
  )
)

(fun (iseven n)
  (if (= n 0)
      true
      (isodd (sub1 n))
  )
)

(block
  (print input)
  (print (iseven input))
)
Implementing a Compiler for Diamondback
The main new feature in Diamondback is functions. You should choose and implement a calling convention for these. You're welcome to use the “standard” x86_64 sysv as a convention, or use some of what we discussed in class, or choose something else entirely. Remember that when calling runtime functions in Rust, the generated code needs to respect that calling convention.
A compiler for Diamondback does not need guarantee safe-for-space tail calls, but they are allowed.
Have a plan of a calling convention before you start coding. Do you need to preallocate stack space for local variables? How will you pass arguments? How will you return to your caller?
Allocate space for local variables in my stack frame?
If your chosen calling convention needs it, you can make a function that precomputes the stack frame size for each function based on the number of local variables. This function can calculate the maximum depth of your stack pointer usage in a body (of a function or of your main our_code_starts_here). For example, a Expr::Number will have a stack depth of 0, while a Expr::UnOp(expr) will have a stack depth of its expr.
How to branch in Dynasm?
There are many ways to branch in dynasm. You can generate a label like this:
let cool_label = ops.new_dynamic_label();
where ops is our dynasm assembler. Then, you can use it to create branches like:
; =>cool_label
; jmp => cool_label
Calling external functions?
We can call external functions (like if we have a Rust snek_error) like:
; mov rax, QWORD snek_error as _
; call rax
OR
let snek_error_ptr = runtime::snek_error as *const ();
let snek_error_addr = unsafe { mem::transmute::<* const (), fn() -> i32>(snek_error_ptr) } as i64;
And then calling it like:
; mov rax, QWORD snek_error_addr
; call rax
Running and Testing
Running and testing are as for Cobra, there is no new infrastructure.
Reference interpreter
You may check the behavior of programs using this interpreter.
Part 3: The REPL
Add Function Definitions to the REPL
Add the ability to define functions to the REPL. Entries should be a definition
(which could be define or fun) or an expression.
Functions should be able to use global variables defined in earlier entries
in the function body. Function definitions should be able to use other
functions defined earlier in the REPL session.
Make sure to not repeat machine code compiled for earlier functions. This can be done by simply calling the already-compiled functions from new machine code that you generate.
Defines in the function body
Make sure that defined variables in the function body will not be known (or inlined) when compiling the function. This is because we can use this function for later entries which may be using a different defined value for the same variable, and your function itself can even modify those variables! Therefore, these functions are not pure. Could we possibly use a technique we already used for set! on a defined variable in Cobra?
There are many things to consider here:
- Our function uses a variable that is
defined in the REPL body. - Our function
set!a variable that isdefined in the REPL body. - Our function calls another function that may or may not
defined a variable (or that function keeps calling other functions...)
For simplicity, if we call any function, we do not know if it modifies the defined variables in the function call site, therefore, we cannot inline, and we must simply use a pointer to the heap for all define d variables. This is similar to how we handled set! for defined variables. Now also when we call any function in a prompt, we must use the heap. We can think of calling a function as something unknown, as in, we do not know what effects it can have on any defined variable.
Extension:
If you want to go a more complicated route with more optimization, you can have multiple preprocessing passes that check what global effects our function calls have. If a defined variable is not impacted in the call site, we can inline the value! Now we might have multiple helper functions that preprocess our Exprs (for finding if we set! a var, if we call a Expr::Fun, if we simply use an Expr::Id, and so on). It might be nice to use a singular helper function that traverses our expr instead of rewriting the same traversal logic. This helper function can be called by other, more specific helper functions that try to match on the desired Expr we are looking for. The function header can look like:
fn traverse_expr(expr: &Expr, f: &mut dyn FnMut(&Expr))
Here we can pass in our Expr we want to traverse. We also pass a unique function f (which can be anonymous) that can be applied to something within our traverse_expr environment (perhaps called on the expr itself...). This function is called a closure, which can capture/close over variables from their environment. Capturing, in this case, means matching to the desired Expr!
Duplicate Label Errors in the REPL
When defining functions in the REPL, you may run into duplicate label errors from dynasm. This is because dynasm labels are global to the entire assembly being generated (if you are reusing ops), and if you define a label with the same name twice, such as label_error, you might accidentally generate the same label twice.
You can either append a unique identifier to each function label, or let dynasm handle it with ops.new_dynamic_label() (even if the label names are the same, you can initalize a unique DynamicLabel to them). Remember that some labels are referenced outside of your current running prompt, (such as label_error or functions), so these DynamicLabels stay the same across prompts. So this means there are two types of labels:
- Labels that are global and persist across prompts.
- Labels that are local to the current prompt and can be deleted/recreated/ignored for future prompts.
Grading
As with the previous assignment, a lot of the credit you get will be based on us running autograded tests on your submission. You'll be able to see the result of some of these on while the assignment is out, but we may have more that we don't show results for until after assignments are all submitted.
We'll combine that with some amount of manual grading involving looking at your
testing and implementation strategy. You should have your own thorough test
suite (it's not unreasonable to write many dozens of tests; you probably don't
need hundreds), and you need to have recognizably implemented a compiler. For
example, you could try to calculate the answer for these programs and
generate a single mov instruction: don't do that, it doesn't demonstrate the
learning outcomes we care about.
Extension: Proper Tail Calls
Implement safe-for-space tail calls for Diamondback. Test with deeply-nested recursion. To make sure you've tested proper tail calls and not just tail recursion, test deeply-nested mutual recursion between functions with different numbers of arguments.

Week 6: Eastern Diamondback
Due 11:59pm on Monday, November 17.
In this assignment you'll implement a static type checker for Diamondback (with a few extensions). The GitHub classroom is at: https://classroom.github.com/a/fFC2jNSB
The test infrastructure is: https://github.com/ucsd-cse131-fa25/cobra-test/tree/main (it is new, so make sure to look at it again!)
Language
Eastern Diamondback has two additions atop regular Diamondback. The language is extended with annotated functions and casts:
<type> := Num | Bool | Nothing | Any
<defn> := (fun (<name> (<name> : <type>)*) -> <type> <expr>)
       | ... as before ...
<expr> := (cast <type> <expr>)
       | ... as before ...
<prog> := ... as before ...
<repl> := ... as before ...
(Dynamic) Semantics
The dynamic semantics of (fun (<name> (<name> : <type>)*) <expr>) are
exactly the same as the dynamic semantics of (fun (<name> <name>*) <expr>).
That is, the dynamic semantics are the same as ignoring the types and compiling
the corresponding un-annotated function.
The dynamic semantics of (cast <type> <expr>) are:
- Evaluate
<expr>to a valuevthen:- If
<type>isNumandvis a number, evaluate tov - If
<type>isNumandvis a boolean, error with a string containing"bad cast" - If
<type>isBoolandvis a number, error with t a string containing"bad cast" - If
<type>isBoolandvis a boolean, evaluate tov - If
<type>isNothing, error with a string containing"bad cast" - If
<type>isAny, evaluate tov
- If
(Static) Semantics
The static semantics—that is, the potential compiler errors—of Eastern Diamondback are where most of its interesting behavior is found. This language has a type-checked mode where many errors that would have been previously reported dynamically are reported at compile time.
The following are the type rules for the expressions in the language. There are a few notational conventions:
Γ e : Tmeans “expressionehas typeTin environment Ôà e ≤ TmeansΓ e : T'andT' ≤ TT1 ≤ T2means “T1 is a subtype of T2”≮means “is not a subtype of”Γis a type environment of the shape[x1 : T1][x2 : T2]..., andΓ(x)means “look up x in Γ”
Γ <number> : Num

Γ true : Bool

Γ false : Bool

Γ input : Any

Γ x : T
  when Γ(x) = T

Γ (let ((x1 e1) (x2 e2) ...) e) : T
  when Γ e1 : T1, Γ[x1 : T1] e2 : T2, ...
  and Γ[x1 : T1][x2 : T2]... e : T

Γ (add1 e) : Num
  when Γ e ≤ Num

Γ (op e1 e2) : Num
  when Γ e1 ≤ Num and Γ e2 ≤ Num
  and op is +, -, *

Γ (op e1 e2) : Bool
  when Γ e1 ≤ Num and Γ e2 ≤ Num
  and op is <, >, <=, >=

Γ (= e1 e2) : Bool
  when Γ e1 ≤ Num and Γ e2 ≤ Num

Γ (= e1 e2) : Bool
  when Γ e1 ≤ Bool and Γ e2 ≤ Bool

Γ (set! x e) : T
  when e : T
   and T ≤ Γ(x)

Γ (if e1 e2 e3) : T1 ∪ T2
  when Γ e2 : T1
   and Γ e3 : T2
   and Γ e1 : Bool

Γ (block e1 e2 ... en) : Tn
  when Γ e1 : T1, Γ e2 : T2, ..., Γ en : Tn

Γ (loop e) : T1 ∪ T2 ∪ ... ∪ Tn
  when Γ1 e1 : T1, Γ2 e2 : T2, ... Γn en : Tn
   and e1, e2, ... en are (break e) subexpressions of e not nested in another break
   and Γ1, Γ2, ..., Γn are the environments for the corresponding expressions

Γ (break e) : Nothing
  when Γ e : T

Γ (f e1 e2 ...) : Any
  when (fun (f x1 x2 ...) e) is defined (an unannotated function)
   and Γ e1 : T1, Γ e2 : T2, ...

Γ (f e1 e2 ...) : T
  when (fun (f (x1 : T1) (x2 : T2) ...) -> T e) is defined (an annotated function)
   and e1 ≤ T1, e2 ≤ T2, ...

Γ (cast T e) : T
  when Γ e : T'
Functions don't have a type calculated for them like expressions, but need to be
checked. For these we just write ok if they successfully type-check.
(fun (f x1 x2 ...) e) : ok        # case for un-annotated functions
  when [x1 : Any][x2 : Any]... e : Any

(fun (f (x1 : T1) (x2 : T2) ...) -> T e) # case for annotated functions
  when [x1 : T1][x2 : T2]... e : T
These rules refer to union ∪ and subtyping ≤, which are defined as:
∀ T . T ∪ Any = Any
∀ T . Any ∪ T = Any
∀ T . T ∪ T = T
∀ T . T ∪ Nothing = T
∀ T . Nothing ∪ T = T
Num ∪ Bool = Any
Bool ∪ Num = Any
∀ T . T ≤ T = true
∀ T . T ≤ Any = true
∀ T . Nothing ≤ T = true
Implementation
Your task is to add a new mode to your compiler for type checking, following
the typing rules above, and to add syntax and semantics for cast expressions
and functions with annotations.
Each of the existing options can have t added:
-tc <prog>.snek <prog>.sshould run the type checker, report any type errors as compile errors, and generate the compiled output if there were no compile errors-tg <prog>.snek <prog>.s <input>and-te <prog>.snek <input>should behave like-eand-g, except they should use the provided value ofinputto calculateinput's type. That is they should use an updated rule forinputthatΓ input : Numand/orΓ input : Booldepending on what was provided-tishould behave like-i, but all REPL entries should be type-checked and only evaluated if they have no type errors- Finally,
-t <prog>.snekshould just typecheck the program and report errors (if any), and if the program type-checks successfully it should print its type (one ofNum,Bool,Any,Nothing)
We suggest some error messages above, but for type errors we only require that the printed message say “Type error” somewhere. It can be complicated to define which error should be reported first in large programs, etc, so we are defining things such that if a program type-checks, it calculates the type for main, and if it does not, it has some static error that says “Type error”.
Note that you should not need to change any existing cases in code generation, just add 2 (straightforward) cases for annotated definitions and for cast. The vast majority of the work should just be for implementing the type checker.
Examples
When not in type-checking mode, all programs should behave exactly the same as they did on Diamondback.
The following examples all asssume type-checking mode is on.
-
# No type errors, produces 25: (fun (f (x : Num) (y : Num)) -> Num (+ (* x x) (* y y))) (f 3 4) -
# No type errors, produces 25 (fun (f x y) (let ((x (cast Num x)) (y (cast Num y))) (+ (* x x) (* y y)))) (f 3 4) -
# Type error because `x` has type `Any` in `(* x x)` which is not allowed (fun (f x y) (+ (* x x) (* y y))) (f 3 4) -
# Type-checks with type Nothing (loop 0) -
# Type-checks with type Anything (loop (block (break 1) (break true))) -
# Type-checks with type Num (loop (let (x 100) (if (> (cast Num input) x) (break x) (break 100)))) -
# Type-checks with type Anything (if (isnum input) input false) -
# Type error (+ input 3) -
# Type-checks with type Num
(+ (cast Num input) 3)
Refactoring and Cleanup
As part of this assignment, you should also do refactorings and cleanups to your compiler. We want you to make 2 commits that are solely for improving your compiler's code quality without adding new features. These commits should do one of:
- Reduce the number of lines of code by removing duplication or simplifying repeated patterns
- Move code into places that you find more logical (could be separate files, or could just be organization in the file)
- Add comments or change formatting of the generated assembly to make it easier to debug
- Add (conditional) print statements or other information-gathering code to your compiler to help with debugging
Make the commits, and then show them with git show <commit-hash-here>, and put
that output into files improvement-commit1.txt and improvement-commit2.txt, e.g.:
git show 435ccbcbecfb60339c4cb7011cad2c965325d869 > improvement-commit1.txt
git show 9dec3506e902ca32f80bd536b5cd79679ec729d0 > improvement-commit2.txt
Include these files with your submission.

Week 8-10: Flying Snake
Due Thursday, December 4, 11:59pm
This week, you will take off (get it, flying snake) in your own direction implementing optimizations for Eastern Diamondback (both traditional syntactic optimizations, and type- and JIT-based ones).
There are some significant format differences from the other assignments:
- You can work alone, or in groups of 2 or 3. You must pre-register your groups by Friday, November 21 via FILL form.
- Github Classroom for groups: classroom
- There are no new language features – the specification of the language is exactly the same as in Eastern Diamondback, with the exception of a special type rule shown below.
- There is no autograder. You will submit a PDF report along with your code.
- There are 5 points available rather than 4, and the points are broken out by functionality so you can target specific goals.
Type Checking and Dead Code
Consider this function:
(fun (asnum n m)
  (let ((n (if (isbool n) (if (= n true) 1 -1) n)))
    (* m n)))
A few things are true about this function:
- It never results in a runtime error no matter the argument value
- It always returns a number no matter the argument value
- It will not type-check with any possible set of annotations in our type system
It's also a nice representation of what “legacy code” might look like in a language like JavaScript or Python, which often allow this kind of type-based overloading of functions.
It would be nice if this function could type-check for our JIT. To accommodate this we will add some type-based optimization, and have four special if rules:
Γ (if (isbool v) e2 e3) : T
  when Γ e2 : T
   and Γ v : Bool

Γ (if (isbool v) e2 e3) : T
  when Γ e3 : T
   and Γ v : Num

Γ (if (isnum v) e2 e3) : T
  when Γ e3 : T
   and Γ v : Bool

Γ (if (isnum v) e2 e3) : T
  when Γ e2 : T
   and Γ v : Num

where v is a Value or Id
These rules ignore a branch of the if expression if the condition will
definitely evaluate to true or false based on known type information.
So, if we type-check the above function with (n : Num) and (m : Num), we
will not consider the (if (= n true) 1 -1) expression in the type-checker.
Similarly, with (n : Bool) and (m : Num) we will not consider the n
sub-expression in the else branch. In both cases the relevant branch
type-checks, and the type of the let-bound n is Num.
AOT Type-directed Optimizations (2 points)
Update your compiler to generate more efficient code if the type-checker is successful on a program. This could mean:
- Skipping tag checks on binary operations
- Simplifying
(isbool e)and(isnum e)totrueorfalseif the type ofeis known to beNumorBool. - Skipping the condition and unreachable branch in
(if (isbool e) e1 e2)and(if (isnum e) e1 e2)when the type ofeis known - Reducing
(cast T e)toeif the type ofeis≤ T - You're free to add other opportunities you see!
This latex file shows an example of typesetting optimization that is possible. When the type checker knows both operands are numbers at compile time, the specific runtime safety checks within the function add become unnecessary.
In your PDF report, include the following:
- Write one or more programs that, among them, trigger all the specific
optimizations listed above. For each of the programs, run it with
-gand-tgand show:
- That the output of the program is correct and the same
- That the assembly is different, and shorter, when run with
-t
-
Consider the program below.
(fun (sumrange start stop step) (let ((step (if (isbool step) (if (= step true) 1 -1) step)) (res 0) (curr start)) (loop (if (if (> step 0) (>= curr stop) (<= curr stop)) (break res) (block (set! res (+ res curr)) (set! curr (+ curr step))))))) (block (print (sumrange 3 10 1)) (print (sumrange 10 3 false)) (print (sumrange 10 3 -1)) (print (sumrange true false 1)))- Run it with the
-gand-tgoptions. Show in the report the test program, the assembly output and answer from the-gcase, and the type error in the-tgcase. - Make it type-check by adding only cast expressions (leave the function
un-annotated). Show the resulting program and run it with the
-gand-tgcases, highlighting specific parts of the program that were optimizationed, and where the cast expression appears.
- Run it with the
JIT Optimizations: eval and REPL (-te and -ti) (1 point)
A program like (+ input 5) cannot type-check with -tc because the type of
input is unknown. However, when running with -te (or -tg), the type of
input is known before compilation; in Eastern Diamondback we saw that we can
type-check the program using these assumptions.
Similarly, at the REPL we can use information about previous defined variables
to type-check future REPL entries and optimize them if they are typable.
For this assignment, make sure that your updates work to optimize the code
generated for input-using programs and at the REPL.
For Your Report:
- Choose one of your example programs from above that uses
inputand show how the generated code differs with-tgfrom-gwith these optimizations enabled. - Show how your implementation is able to optimize a function that refers to a
variable defined earlier in the REPL session run with
-ti. You can add code to print the generated assembly at the REPL; include the REPL trace in your report.
JIT-based Optimizations: Functions (2 points)
The type-based optimizations are ineffective on un-annotated functions without casts, especially when we can't infer anything about functions' types from their call sites, which we may only find out about later.
(For the computational model you should have in mind, consider a web page,
where dynamically-loaded scripts may calculate the type of their arguments to a
function only in response to user input, or a computational notebook where
types may only be known once a CSV file is read and its columns parsed. The REPL
and input are our proxies for the unknowns in these situations.)
Implement a just-in-time compilation for (un-type-checked) functions that optimizes them when they are first called based on the types of the arguments in that call. When run in non-type-checking mode:
- Each function should compile to a “stub” (and potentially a “slow” version)
- The stub should call back into the compiler with (a) an id for the funciton itself and (b) the given arguments from the first call.
- The compiler should type-check the function based on the types of these arguments. If type-checking is successful, it should generate an optimized version of the function (as above), and reconfigure the stub to call the optimized version. If type-checking is not successful, it should reconfigure the stub to call the slow version always.
- Future calls to the function should check the arguments' tags. If there is a fast version that matches those tags, it should be called, otherwise the slow version is called.
Here is a recommended (but not required!) strategy for this. Focus on -e/-g:
Write a new Rust function called compile_me, and add generated code at the top
of every function to call back into compile_me with enough information to
locate that function's AST. In compile_me for now, just print out information
about the function, its name and argument names for example, to make sure you
know how to access it. This will require a global functions dictionary, or
putting the program's AST in a global variable in Rust, or some other solution
to access the function information from compile_me. Leave the existing
behavior of your function compilation alone for now! Just add this extra call
that prints information and returns back.
Next, update the information you have available for each function to contain a few (mutable) heap-allocated pieces of configurable metadata. This should be created when the function is compiled. In class we talked about two that should be sufficient:
- one to use as a three-valued flag for “not compiled yet”, “fast version available”, and “only slow version available”.
- one to hold the address of the fast version once generated
Make it so your
compile_mefunction can print and update these. You should be able to do things like print out"First call to f!"and"Called f again!"using just this state.
Next, make it so you can pass and access the arguments to the function in
compile_me. You may find it useful to just do this for 0-2 arguments first and
worry about the full-arity cases later. Then, add code to compile_me to
typecheck the body of the function using the environment generated from the tags
of the arguments. For now, just print the values of the arguments and whether or
not type-checking succeeded in compile_me to make sure this is working.
Next, figure out how to make an Assembler (what we've often called ops)
accessible as a global variable in the Rust file. There are a few approaches for
this; it's a good thing to search around about and ask an LLM to help with. Make
that change, make sure you know how to refer to and change it as a global, and
just commit that. Try to not change your existing function signatures, but still
preserve the ability to access and mutate ops from compile_me.
Now you're ready to generate code in the middle of a function call! Update compile_me to:
- If type-checking fails, return 0
- If type-checking succeeds:
- Generate the code for the type-checked version and add it to the global
Assembler - Commit the generated code
- Save the address of the generated code to the metadata you set up
- Return the address of the generated code back to the caller
- Generate the code for the type-checked version and add it to the global
Then in the generated code, add logic to continue with the “slow” version if the
return from compile_me is 0, or jump immediately to the returned value if it
is nonzero (indicating successful type-checking). At this point you should be
able to see the “fast” generated code execute, but compile_me will be called
every time.
Finally, add generated code at the top of each function to check the metadata about the function and take the appropriate action of either doing the first compile attempt, jumping straight to the slow version, or jumping to the fast version.
There are a few details up to you here – how to check the tags before or in the
fast function and, if they don't match the fast types, jump back to the slow
version. The representation of the metadata, functions dictionary, and precise
signature of compile_me is also up to you. But this scaffolding should give
you ways to incrementally work through the steps needed and check your work
along the way.
When you're done, you should be able to demonstrate (with -e), the sumrange
program from above, which should:
- Optimize based on all-number arguments (the first call)
- Call the slow version for the call with two numbers and a boolean
- Call the fast version for the second call with three numbers
- Have the correct error on the last call (where a boolean is given for a number)
In your report: Show the sumrange program running and how the sequence of
calls works by adding appropriate prints of assembly code and output, or showing
steps in a debugger, or otherwise demonstrating that your compiler can run an
optimized version and a slow version of the same function.
In your report: Show also any other interesting tests you write along the
way – even if you don't get sumrange working perfectly, can you show the
optimization running on a simple function that just adds its arguments? Where
does it break? Show examples of what cases your compiler can and cannot cover.
Handin
Hand in your project to Gradescope as two submissions:
- A PDF of your group's report to
pa7-report - Your group's code to
pa7-code
Happy hacking!